Important notes
- You can configure more than one Exchange account per device for iOS 4.0 and higher. Only one Exchange account can be configured for older iOS versions.
- By default, the communication between the iOS device and Exchange Server is secure, using 128-bit SSL encryption and X.509 certificates.
Adding an Exchange account to an iOS device:
- For iOS 10: Go to Settings > Mail > Account > Add Account.
For iOS 9 and lower: Settings > Mail, Contact, Calendars > Add Account. - On the Add Account screen, tap Microsoft Exchange.
- Enter the full email address in the Email field and your mailbox password in the Password field, then tap Next.
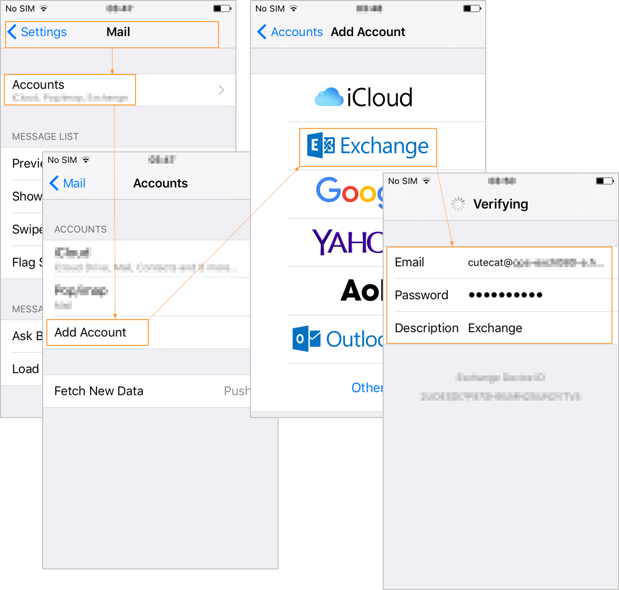
- The device will try to configure the Exchange server address automatically. If the server address can’t be determined, you will be asked to enter it.
Server name: Your Exchange Proxy server name. Contact us if you do not know your Exchange Proxy server name.
There are two sets of settings that can be used for Domain and Username fields:- Domain: Leave it blank
Username: specify the full email address - ActiveSync domain and username that can be requested, if you do not already have this information.
- Domain: Leave it blank
- The device offers to immediately sync with the Exchange server. If you choose not to sync at this time, you can turn on calendar and contact syncing later in Settings > Mail > Account, select your account.
For iOS 9 and lower: Settings > Mail, Contact, Calendars, select your account.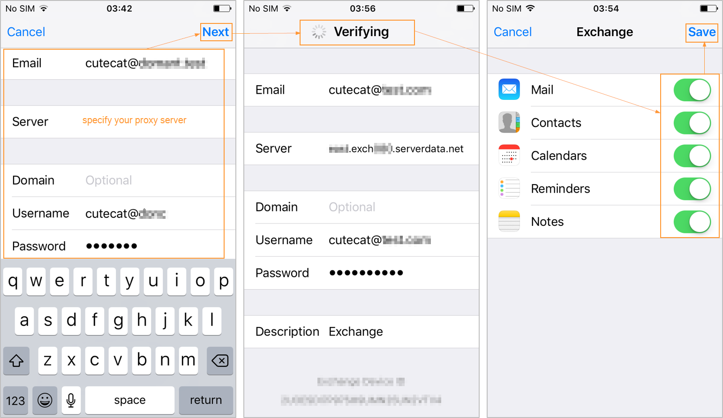
- By default, Exchange ActiveSync pushes new data to your device as it arrives on the server. If you prefer to fetch new data on a schedule or to only pull new data manually, go to Settings > Fetch New Data to change the settings.
- To change how many day’s worth of data is synced to your device, go to Settings > Mail > Account, select your account. The default setting is three days.
- To complete the setup process, tap Save and wait for the iPhone to test your incoming and outgoing mail settings and connect to your mailbox.
Please note that not all Exchange features are supported (for example, folder management).